You can manually add tables in an environment and define their technical and business properties. You can use User-Defined Fields to define additional properties of a table. Also, you can UI labels of the User-Defined fields can be configured in Language Settings.
To add tables, follow these steps:
- Go to Application Menu > Data Catalog > Metadata Manager > Explore.
- On the Explore tab, click an environment tile to view its details and tables.
- Click Options.
The available options appear.
- Click Add Table/Component.
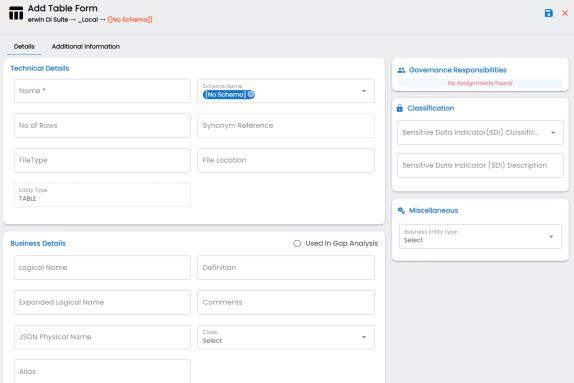
- Enter or select appropriate values in the fields. Refer to the following table for field description.
- Click
 .
.
The Add New Form page appears.
|
Field Name |
Sub-Field |
Description |
|---|---|---|
|
Technical Properties |
Name |
Specifies the physical name of the table. For example, Account or Currency. |
|
Schema Name |
Specifies the schema name of the table. For example, dbo. |
|
|
No of Rows |
Specifies the total number of rows in the table. For example, 100. |
|
|
Synonym Reference |
Specifies the synonym reference of the table. For example, Sales_Rep_Information. This field is autopopulated during the metadadata scan. You cannot enter it manually. |
|
|
File Type |
Specifies the file type of the table if the table is in a file-based environment. |
|
|
File Location |
Specifies the location of the file type. |
|
|
Entity Type |
Specifies the entity type of the new component. It is autopopulated with Table. |
|
| Business Details |
Used in Gap Analysis |
Specifies whether the table is being used as part of a gap analysis to check table usage in mappings. Select the check box if the table is used in gap analysis. For more information on performing table gap analysis, refer to the Performing Table Gap Analysis topic. |
|
Logical Name |
Specifies the logical name of the table. For example, if the physical name of a table is DIM_Customer, then the logical name of the table is Customer Dimension. |
|
|
Definition |
Specifies the definition of the table. For example: The table contains five columns with emp ID column as the primary key. |
|
|
Expanded Logical Name |
Specifies the expanded logical name of the table. For example, if the physical name of a table is RM_Resource, then the expanded logical name of the table is RM Sales Representative. You can configure expanded logical name of tables in bulk at system and environment level. |
|
|
Comments |
Specifies comments about the table. For example: The table contains details of the employees. |
|
|
JSON Physical Name |
Specifies the JSON physical name of the table if the table is in a JSON environment. For example, account. |
|
|
Class |
Specifies the table class property. For more information on configuring table class, refer to Configuring Table and Column Class topic. |
|
|
Alias |
Specifies the alias name of the table. For example, Sales_Representative_Table. |
|
|
Governance Responsibilities |
Data Steward |
Specifies the name of the data steward responsible for the table. For example, Jane Doe. Users assigned with the Legacy Data Steward role appear as drop down options. You can assign this role to a user in the Resource Manager. To assign data steward, select a data steward from the drop down options. For more information on assigning roles and users, refer to the Updating Data Governance Assignments topic. |
|
Classification |
Sensitive Data Indicator (SDI) Classification |
Specifies the SDI classification of the table. For example, PHI. For more information on configuring SDI classifications, refer to the Configuring Sensitive Data Indicator Classifications topic. |
|
Sensitive Data Indicator (SDI) Description |
Specifies the description of the SDI classification. For example: Protected Health Information. The field autopopulates based on the SDI classification. |
|
|
Miscellaneous |
Business Entity Type |
Specifies the database type of business entity. |
The table is added to the environment.
|
Copyright © 2026 Quest Software Inc. |